

Taking the lessons learned from the mini board, I embarked on the adventure of printing the full size board. I changed slicer settings to 2.7mm brim for adhesion and stability. 5% fill all the way (only to support the top 3 layers so I had something for the glue. It would be nice to find another solution I don’t think the infill at 5% provides any real strength to the rails I just need support at the top), solid infill every 240 layers (not sure I needed it but thought some support in the rails would be helpful since I was doing 5%)
THE BACKGROUND
 Sitting
at breakfast one morning with my son admiring the miniature surfboards
on the wall, I said “I bet we could make a surfboard on the 3d printer”
and he exclaimed “that would be so cool!” So here we are, nearly a year
later and we have finally completed the challenge of a 3d printed
surfboard. This page documents the journey, pitfalls, and ways to do it
better next time…if there is a next time.
Sitting
at breakfast one morning with my son admiring the miniature surfboards
on the wall, I said “I bet we could make a surfboard on the 3d printer”
and he exclaimed “that would be so cool!” So here we are, nearly a year
later and we have finally completed the challenge of a 3d printed
surfboard. This page documents the journey, pitfalls, and ways to do it
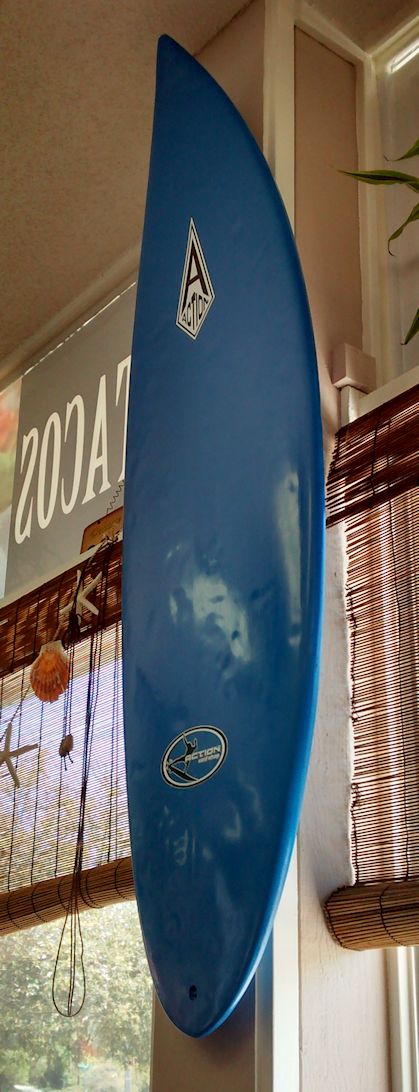
better next time…if there is a next time.If you have never glassed a board before, do not believe the videos that make it look so easy to do. Pour a little here…brush a little…squeegee a little…tuck a little…sand a bit to make it look nice then shine it up. Easy. Yeah right. I’ll go in more detail later but suffice it to say you’ll need to spend hours reading, watching, and doing before you’ll even get mediocre results on a board like I’ve cooked up.
THE DESIGN
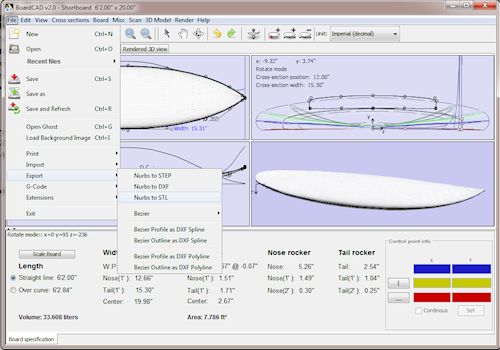
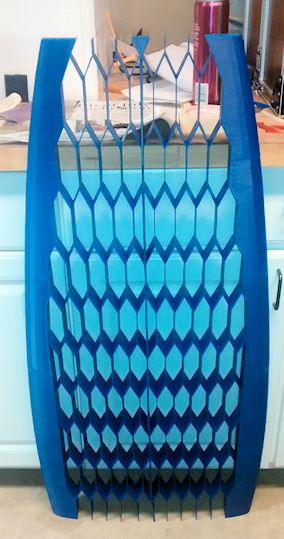
Okay, the initial board shape was actually pretty easy. Using the defalut shortboard template in BoardCAD, I scaled it out to 6’2″ x 20″ x 2.675″ then exported it as an STL file. BIG thanks to mesheldrake for pointing me to this software! There was no way I was going to tackle a scratch design this complex. My stl files are on Thingiverse.
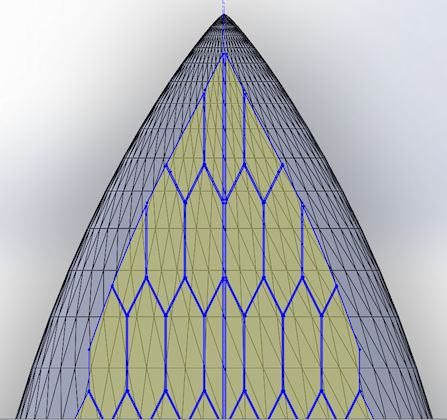
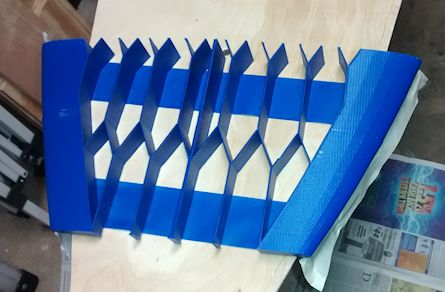
This design was imported into Solidworks for the Extruded Cut pattern. The pattern consists of diamonds 35mm x 140mm (4:1) with the longest legs at 70mm (2:1). I had made a few templates from a base of 20mm thru 40mm. There was a large difference in the amount of ABS material required so a 35mm base was a compromise that I thought would still support the glass and reduce weight. The diamonds were separated by 1.35mm which is 3 perimeters on my machine.
 The
‘stringer’ is 2.70mm allowing this to be a cut and print in two
manageable, glue-able pieces. I then trimmed the pattern down to keep
it at least 2 inches from the rails until the nose where it tapers down
to about an inch. An initial version had a full nose but the layers were
separating too much to be usable. Same problem with the tail but
unavoidable due to the leash cup.
The
‘stringer’ is 2.70mm allowing this to be a cut and print in two
manageable, glue-able pieces. I then trimmed the pattern down to keep
it at least 2 inches from the rails until the nose where it tapers down
to about an inch. An initial version had a full nose but the layers were
separating too much to be usable. Same problem with the tail but
unavoidable due to the leash cup.The leash cup was also an Extruded Cut at the tail to accommodate a vented leash plug from Greenlight Supply. Be sure to have one on hand for measurements before committing to the print:-)
 I
used netfabb Studio Basic to cut the STL down into chunks my printer
can handle. 9 sections lengthwise with 7 split along the stringer.
Each piece was saved as a separate STL file.
I
used netfabb Studio Basic to cut the STL down into chunks my printer
can handle. 9 sections lengthwise with 7 split along the stringer.
Each piece was saved as a separate STL file.THE TEST BOARD – 1/3rd scale
I split the board into 3 pieces and sliced all three pieces on one plate with RepetierHost and Slic3r. The changes I made to my default .3mm profile were to add a brim of 1.35mm, and changed the infill down to 5% and ‘only where needed’. (changed for bigger board). The print was going great until the last 20 layers or so where the print head shifted on the y-axis by about 1mm. This was not a catastrophic failure but it showed me why I should probably print one section at a time on the larger model so as not to lose too much if this occurred again.
After removing the brim, the board was assembled using some fast set acrylic glue (gel) which gave a strong join in 60 seconds. It was difficult to get all the little ‘diamond’ parts to align but it came out pretty good. The individual parts were quite flimsy but everything firmed up when assembled. Not so well on the larger model as you will see.

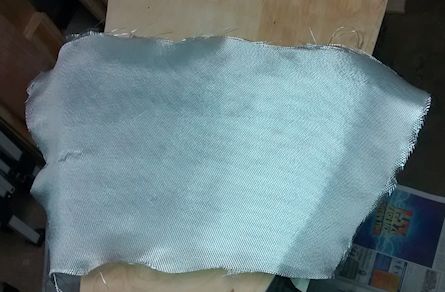
Glassing consisted of a sheet of whatever oz glass I had laying around and Sun Cure polyester resin. Working at this scale was super easy. I just brushed on the resin, wetting out the fiberglass completely but not so much that it was dripping through. Sun Cure is much less viscous than the Epoxy resin I will work with on the larger board. The best part of using a UV resin is that you can take your time before you go out in the sun to set the resin.
I used a cut-lap method which means I exposed the resin until it firmed up then brought it inside to trim off the excess glass with a razor blade. Then I finished off the cure in the sun for a few minutes. The other side was done the same way and a sanding coat applied to both sides in just a couple hours.

The fins were scaled down versions which were laminated without fiberglass. Easy peasy!
I thought I learned a few things from putting this mini-board together but I now know that the hard lessons were still to come…
GOING FOR BROKE – PRINTING AND ASSEMBLING FULL SIZE
If you look closely at these early prints you’ll notice a wavy pattern near the corner that was caused by a wobbly extruder mount. I had tried to get some extra z-axis height by raising the extruder up off the rods by an inch which made it less stable at high speed. Fortunately, or unfortunately, it happened that a roll of filament became tangled and the resulting mess occurred in the middle of the night. So whilst I slept, my 3d printer was noisily destroying itself. In the morning, I was unpleasantly surprised to find a broken belt mount and a pile of spaghetti on the floor. I took this opportunity to fix all the quirks of my printer and stabilize the extruder.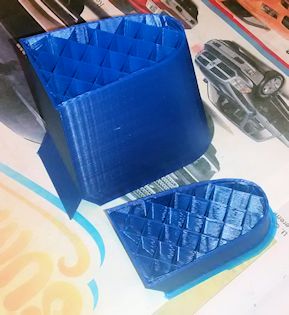 Each
part took at least 10 hours to print which gave me plenty of time to
assemble them in sections. Coming off the printer, each piece had to be
cleaned up with a razor blade. The individual sections were flimsy and I
had to take care not to break them. Removing the brim was tedious and
had me reconsidering the way I cut the larger model. Perhaps next time I
build a printer it will be 3 foot tall and 2 foot wide…
Each
part took at least 10 hours to print which gave me plenty of time to
assemble them in sections. Coming off the printer, each piece had to be
cleaned up with a razor blade. The individual sections were flimsy and I
had to take care not to break them. Removing the brim was tedious and
had me reconsidering the way I cut the larger model. Perhaps next time I
build a printer it will be 3 foot tall and 2 foot wide…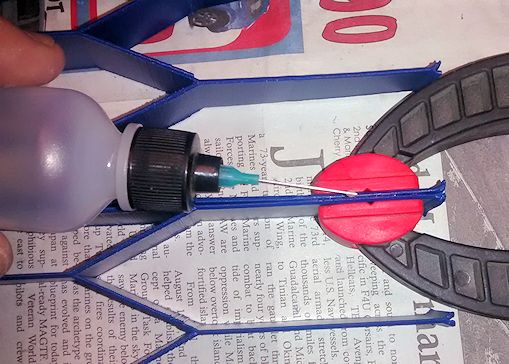
i used clamps and Weld On #3 (very fast set) acrylic solvant to join the two horizontal halves together at the stringer. This just happened to be what I had on hand but turned out to work very well. The instant bond allowed me to work quickly.
The vertical pieces were joined using Weld On #16 fast set acrylic glue. A medium build gel that was great for joining the large flat surfaces. I only needed to hold the pieces in place for about 60 seconds working one side at a time.
The smaller connections were made using the Weld On #3 by holding them aligned and allowing capillary action to draw the glue in and holding for about 15 seconds each.

By working from the middle of the board to the nose and tail I could use the flat ends for support. One thing I should have done is wipe down the rails with acetone as each section went together. If any layer is not well bonded from printing, the acetone will take care of it. I had some major splitting under it’s own weight when I tried to lay the board flat on a table. After using the Acetone wash, it was much more solid but I didn’t risk laying it down again until I had built a support system which I would need for glassing.
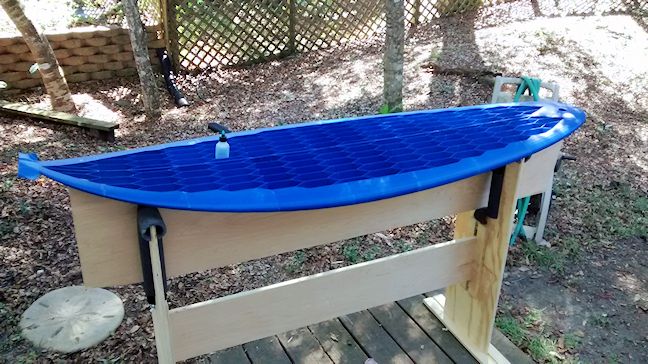
Here’s the surfboard mounted on a piece of 1/4 ply that is bent to support the board along its length. Perfect for cleaning up all the joints and rough edges. Another support was made so I could flip the board to clean up the other side. This was also my glassing stand.
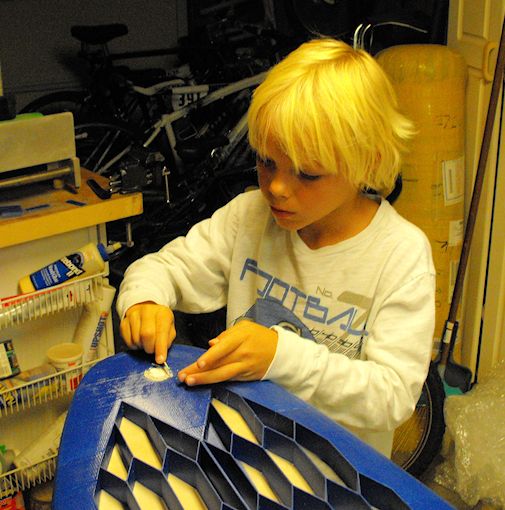 And finally, Matej came out to help me out on the vented leash cup. This board was his idea, now it’s time for his sweat equity.
The thought on a vented leash cup is that it will release air pressure rather than allow the pressure to de-laminate the board. I drilled a couple holes in the bottom of the hole and a few more holes in the tail section toward the center of the board. Air should flow pretty easily between the ‘diamonds’ to escape through the tail. If not, too late. Remember, no science here, just hopes and dreams and unicorn farts.
All done and ready for the glassing.
THE GLASSING
If not for the glassing, I’d have been pretty damn proud of this project. The fact is this was difficult, did not go as rehearsed, and didn’t turn out as nice as I wanted. I had watched all the experts doing their thing…well…expertly on YouTube. They made it look easy. Hell, even my little test board was a snap. How hard could this really be? Hard. Really hard to get right.The Test Run
 Materials handy – Check!
Glass laid and trimmed – Check!
First Lam applied – Check, check, double-check!
Sweet, it is just like the YouTube video…Look how clear that finish is…
The Real Deal

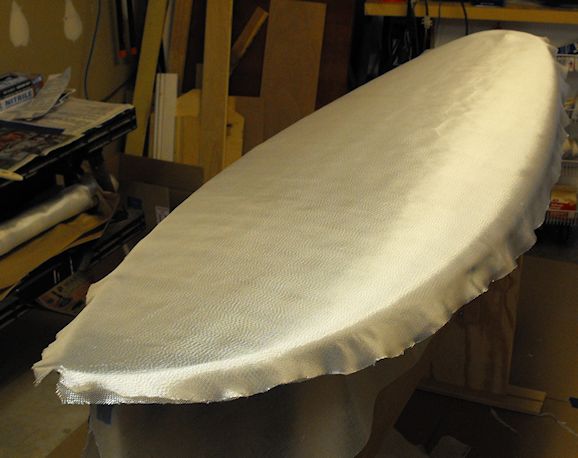
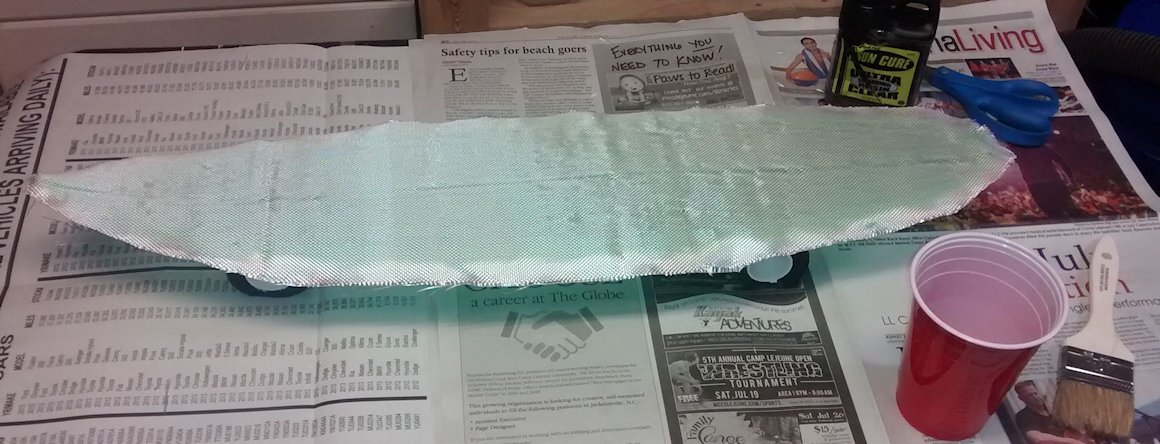
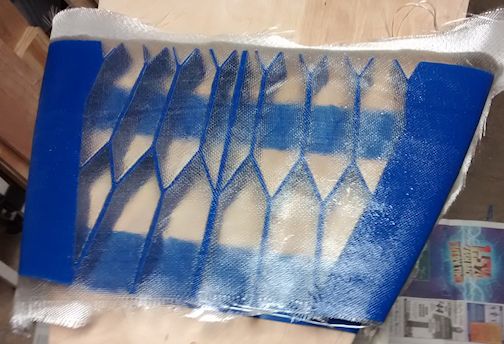
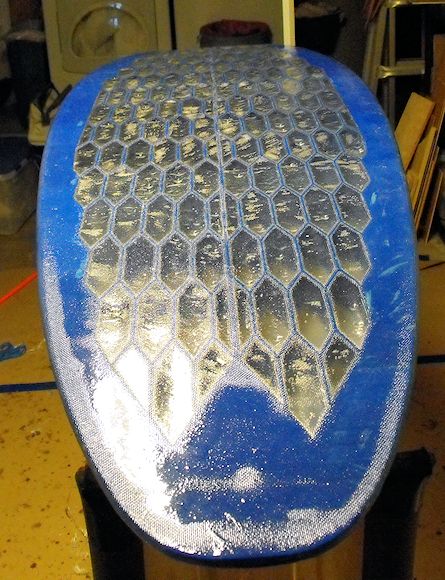
Got the board laid out with a layer of 4oz over 6oz glass trimmed to about an inch past the rail. Relief cuts on corners.
Mixed 12oz (375cc) resin. For epoxy that’s 8oz resin to 4oz catalyst.
From the start, I learned the true ‘going off’ time of epoxy resin. I could feel the cup heating up in my hand with only half the resin laid out and a quarter of the board glassed. I started trying to get a clean line but ended up with a bit of a mess where the resin would not flow and saturate the glass. The second half went better because I rushed, but this turned the epoxy a milky white as you can see in the picture. Key takeaways: Mix less, work slow. Also notice the wax paper under the board. In my test run the epoxy dripped down and glued the test piece to the plywood. The wax paper prevented sticking but I still had a lot of clean up before I could glass the other side due to the little beads that formed on the other side.
 Now
for the other side, the bottom. I made the mistake of reading too much
on traditional boards so I thought I could go with just one layer of
6oz on the bottom. If I had bought more 4oz glass I would have added it
after seeing what it looks like now. The problem with this kind of
board is that there is no foam underneath to prevent the excess resin
from flowing right through the glass and down to the top of the board.
And with only 6oz glass, there isn’t enough glass density to hold a lot
of the resin back.
Now
for the other side, the bottom. I made the mistake of reading too much
on traditional boards so I thought I could go with just one layer of
6oz on the bottom. If I had bought more 4oz glass I would have added it
after seeing what it looks like now. The problem with this kind of
board is that there is no foam underneath to prevent the excess resin
from flowing right through the glass and down to the top of the board.
And with only 6oz glass, there isn’t enough glass density to hold a lot
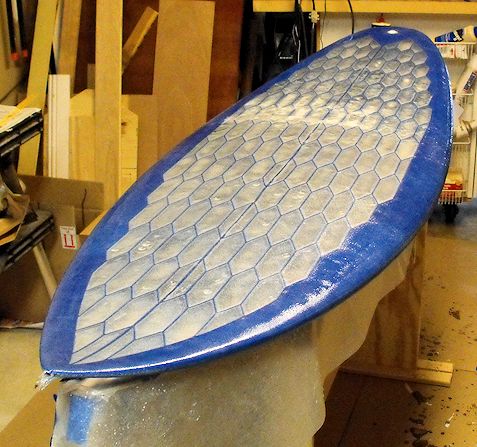
of the resin back.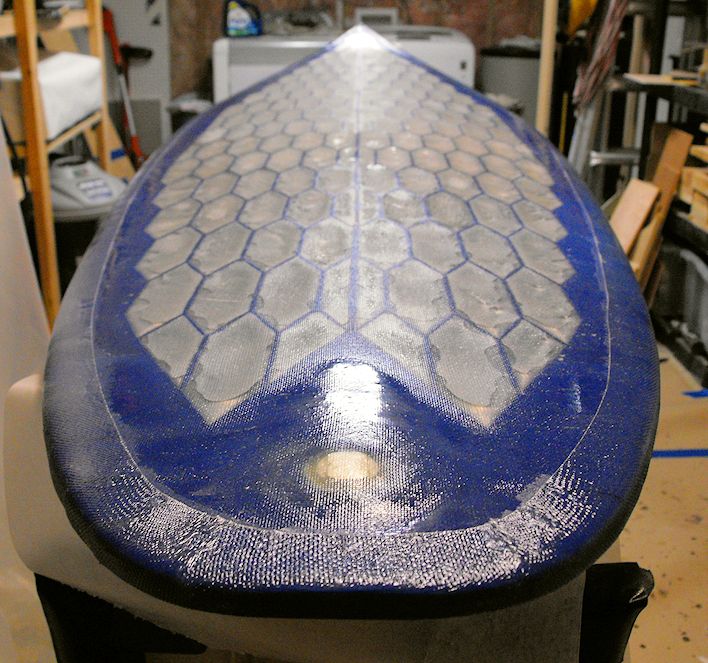 The
result was that there were a ton of pinholes where the sanding coat
seeped through creating a pearl of resin on the other side. And you can
see the blobs of resin around the V’s in the tail. I also tried to do a
cut lap all the way around to strengthen the rails but this was a
challenge to sand so I barely knocked it down before putting on the top
sand coat and it was clearly visible in the end. But it was much easier
to clean up than the full lap of the first lamination.
The
result was that there were a ton of pinholes where the sanding coat
seeped through creating a pearl of resin on the other side. And you can
see the blobs of resin around the V’s in the tail. I also tried to do a
cut lap all the way around to strengthen the rails but this was a
challenge to sand so I barely knocked it down before putting on the top
sand coat and it was clearly visible in the end. But it was much easier
to clean up than the full lap of the first lamination.THE FINNING?
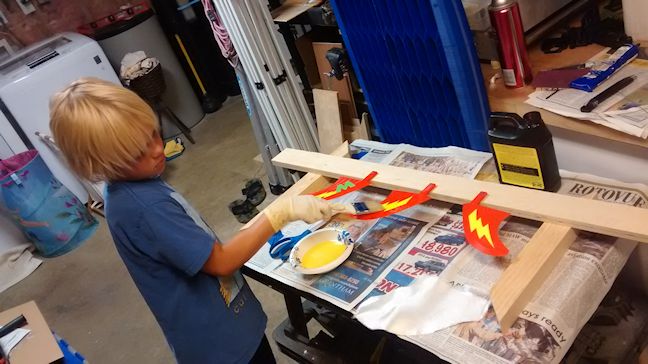
The fins were 3d printed and laminated with the Sun Cure poly resin for expediency. Matej got in there and prepped the first coat then lost patience with the 10 minute cure in the sun and went back to the Xbox. You can make more on Minecraft in 10 minutes than in the real world…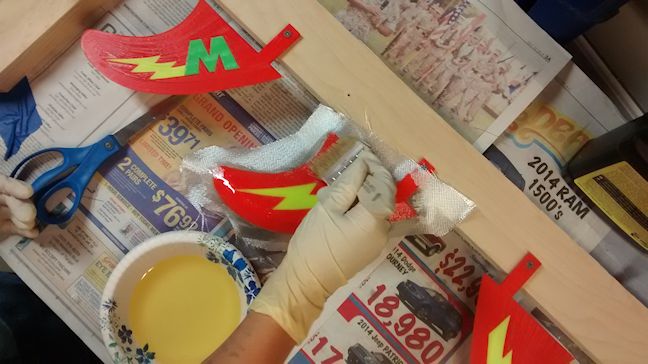
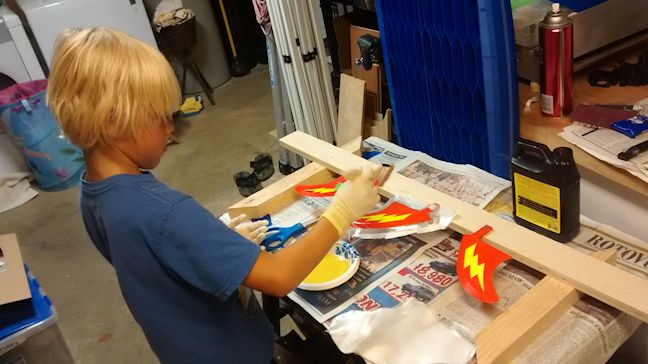
Same process here as making the mini board except we wet out the plastic before applying the fiberglass to reduce the chance of trapped air bubbles. One layer of glass for this step plus a sanding coat to shape them up. Since I’m using Epoxy resin later, I sanded them down thoroughly and rubbed them down with Acetone to minimize problems with wax in the polyester resin Sun Cure.

I made some fin rope from 6oz scraps and cut 12 pieces of 6oz to glass on the fins. I also cut the appropriate angles in some scrap wood as a jig to hold the fins in place and make it easier to align them properly. NOTE: Undercut the bottom by a quarter inch to prevent the block from becoming glued to the fins. I used some 5 minute epoxy from the hardware store and masking tape to hold the fins in place until the epoxy set 20 minutes later. NOTE: be sure to extrude a bit before using the epoxy, it doesn’t come out evenly mixed at the start.
 There
are plenty of videos that explain the glassing process from there. Wet
out the 12 pieces of glass and apply some saturated rope and 2 pieces
to each side of the fins. Work your fingers along the base and edges to
shape and eliminate air bubbles. I should have taped off the work
area, I had resin drips along the edge. I also switched to the Kwik Kick
resin for this step and sanding coats.
There
are plenty of videos that explain the glassing process from there. Wet
out the 12 pieces of glass and apply some saturated rope and 2 pieces
to each side of the fins. Work your fingers along the base and edges to
shape and eliminate air bubbles. I should have taped off the work
area, I had resin drips along the edge. I also switched to the Kwik Kick
resin for this step and sanding coats.THE FINISHED PRODUCT – ALMOST
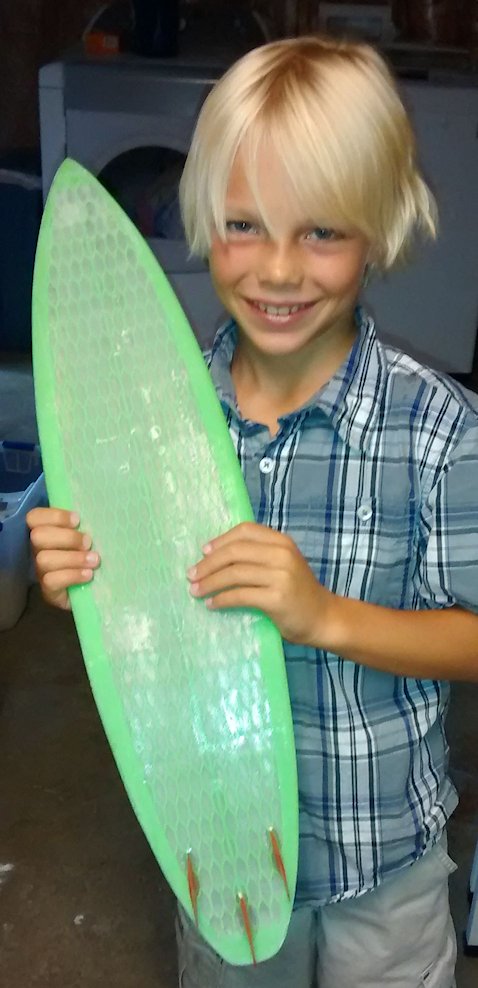
The board still needs some filler to close up some fish-eyes and pinholes then I’ll sand down the entire board and use a surfboard sealer that I picked up to shine up the board. I think I can sand off about a pound of material to get closer to 9 pounds which is still heavy but easier for Matej to carry down to the beach.I will post some pictures of the board being surfed as soon as we get a decent swell here in North Carolina. It’s been a while and not looking good.
THE OOPS AND WHAT IFS SUMMARY
Not sure if I would ever do this again because the time required is huge, cost is about the same as a traditional board in the store, and I don’t have the skill to do it perfect next time. But if I did, here’s what I would consider doing differently:- Put indexing holes on top and bottom of all middle parts to align rails easily with a printed ‘dowel’.
- Use shorter or thicker ‘diamond’ pattern, printing the 140mm distance resulted in poor quality toward the top from vibrations and the print head pushing the thin slats around.
- Redesign the tail to reduce splitting. Try a spiderweb of support away from the leash cup.
- Rub down all parts with Acetone before assembly to improve layer bond and reduce wobble.
- ‘glass’ with Sun Cure so there is no time crunch or find a professional glasser that will take on this challenge. Or possibly wet out the glass on a separate surface then transfer it to the board.
- Try 2 perimeters. Hey that’s 2/3rds the weight, right?
- Switch to 2 layers of 4oz glass on both sides or even 3 layers on the top. Might hold the resin better because of the tighter weave.
- Do cut laps but keep them near the rail, more than half lap for some overlap strength in the rail. Produced a cleaner line and very little cleanup sanding required.
- Tape off fin area when glassing on the fins to protect the rails from drips
STATISTICS
| 1,028,117 mm | Length of ABS 1.75mm filament required. |
| 164 hrs/6.8 days | Printing time at default speed. |
BOM -
| 3 yards | 4oz E fiberglass (should have had 5 yards) |
| 5 yards | 6oz E fiberglass |
| 3 quarts | Epoxy Resin, Resin Research, 2100 Fast (maybe slow next time). |
| 6 | wide chip brushes to apply epoxy to fiberglass |
| 2 | quality brushes to apply sanding coat |
| 2+ | quality mixing buckets with measurements |
| 3 pints | Kwik Kick Epoxy, Resin Research |
| 1 | Leash cup, vented |
| 1 Tube | Medium-bodied solvent cement (weld on #16) |
| 1 | Very fast set solvent (weld on #3) |
| misc | Stir-sticks, Additive F, Razor blades, Masking tape, Sharp scissors, Wax paper. |
| 4kg | ABS filament (2.5kg est., 3.5kg used due to mods and errors) |
The leash cup came from Green Light Supply and the rest of the glassing gear came from The Shaping Shack because the epoxy resin was cheapest there.
I usually get my filament from SainSmart for about $27/kg shipped. Just got an email on filament @ $16/kg + $15 flat shipping for any qty from FairWagon.org. I’ve had some from them in the past and it was fine but they were shipping out of Canada and it cost a lot. This would bring the cost of filament down to less than a foam blank.
